Report, edit, etc...Posted by Syphon on 2005-10-29 at 12:20:14
Do you have a mild question that no one seems to help you with?
Do you want to get into terrain but don't know where to start?
Are you a beginner at terrain with a beginner's question?
Look no further!
[center]=-=-=-=-=-=-=
The Resources.
=-=-=-=-=-=-=[/center]
[center] SCMDraft2
Starforge
X-tra Editor [/center]
[center]=-=-=-=-=-=-=
The Palette.
=-=-=-=-=-=-=[/center]
[center] ~SCM [√], Starforge [√], X-tra [X]~ [/center]
The palette is a wonderous device, every possible terrain tile within a tileset (Jungle, Ashworld etc.) indexed for blending and creation of custom pieces.
~SCMDraft Aproach~
1.Open SCMDraft with any map you have in mind.
2.Now either click Windows > Terrain Palette. Or isometrical > Tileset Indexed along the top GUI.
3.If the later; You're done! Just drag the sides of the window into a larger format for increased visibility.
b)If the former, click Isometrical > Tileset Indexed on the new popup window, drag into a larger window and tada! You're done.
~Starforge Aproach~
1.Reapeat step one from the previous, replacing SCMDraft with Starforge.
2.Click Unit Layer > Terrain Layer on the top GUI.
3.Click Palette.. on the new side GUI.
4. Tada, you're done. The new window is Starforge's sexy default large palette.
[center]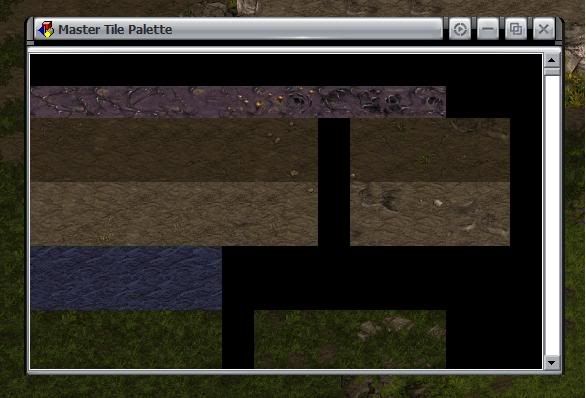 [/center]
[center]=-=-=-=-=-=-=
Brushes of Leonardo.
=-=-=-=-=-=-=[/center]
[center] ~SCM [X], Starforge [√], X-tra [X]~ [/center]
Brushes are a nice Starforge only feature wich can make terraining go by much faster with a little experience.
1.Open starforge and your map/terrain piece.
2.Click Unit Layer > Terrain Layer on the top GUI.
3.Click Custom... on the new side GUI
4.This is the brush palette, notice the emptiness.
-To add custom brushes-
1.Drag the mouse (while clicked) over your terrain piece.
2.Right click > Create Brush.
3. Tada, you're done. Right clicking areas on the brush make them transparent and to save the brush just click save!
[center]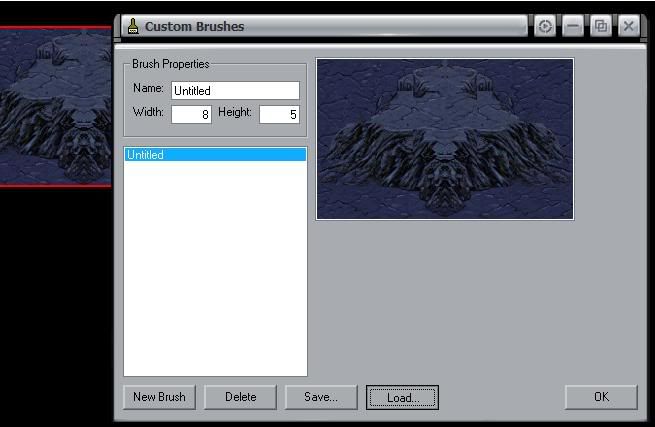 [/center]
[center]=-=-=-=-=-=-=
Cut and Paste.
=-=-=-=-=-=-=[/center]
[center] ~SCM [√], Starforge [X], X-tra [X]~ [/center]
1.Open your piece in SCMDraft and click Isometrical > Cut/Copy/Paste on the top GUI.
2.Open the terrain palette while in this layer.
When in this mode simply right click and select copy / paste / cut, or use the coresponding keyboard shortcuts.
[center]=-=-=-=-=-=-=
Cliffs; Always Seen, Never Heard.
=-=-=-=-=-=-=[/center]
[center] ~SCM [√], Starforge [√], X-tra [X]~ [/center]
Cliffs are simply dirt to high dirt with a few more high dirts in between.
1.Open your favorite palette program.
2.Lay some isom high dirt and put water around it.
3.Exchange the water for matching cliff pieces in the palette.
4.If you're too lazy just add the tiles onto the high dirt. (I wouldn't suggest starting there.)
[center] [/center]
[center]=-=-=-=-=-=-=
Blending for Dummies.
=-=-=-=-=-=-=[/center]
[center] ~SCM [√], Starforge [√], X-tra [X]~ [/center]
The most important aspect in terraining, how to make your pieces not blocky without resorting to sprites. (Which is incredibly useful for large maps.)
1.After making your initial most likely poor isom and rectagular piece open up the good ol' palette and start searching.
2.Look CAREFULLY it doesn't have to be a piece of a cliff to finish your cliff-temple blend. Hell, it doesn't even have to be a piece of temple, maybe it could be a piece of the bridge?
3.Be patient, you won't get godly skills overnight and it might take longer than 2 if at first your blend doesn't succeed try, try again.
[center] [/center]
[center]=-=-=-=-=-=-=
Doodads and Sprites.
=-=-=-=-=-=-=[/center]
[center] ~SCM [√], Starforge [√], X-tra [√]~ [/center]
A sprite is a static image within the game that units can walk under, a doodad is a sprite combined with a piece of tileset unique terrain that serves as an obstacle or as cover.
~SCMDraft Aproach~
1.Open SCMDraft and click Terrain > Sprites on the top GUI.
2.Look through the list of sprites until you find one you like, the place it.
For doodads.
1.Click Windows > Doodad Palette on the top GUI
2.Place the doodads on the right terrain, illegally placed doodads are just plain ugly.
~Starforge Aproach~
1.Open Starforge and click Units Layer > Sprites Layer on the top GUI.
2.Next, click Mode : Unit on the side GUI, it should now say Mode : Sprite and the tree menu should be much much larger.
3.Simply look thtough the tree for the sprites you want, even the units are counted as sprites.
For doodads.
1.Open the custom brush palette in starforge.
2.Click Load... and select the set of doodads you want from the Starforge Data file.
3.Again, don't use the for ugliness.
~X-tra Approach~
(Sprites not supported.)
1.In X-tra editor click Terrain Layer > Doodad Layer on the top GUI.
2.BOOM the doodad palette pops up automatically and you're good to go.
~EldFire.GRP~
Perhaps the most wondered of sprite in all of terrain, eldfire.grp is basically a unused bullet that now serves no other meaning than making waterfalls sparkly.
It is located in Sprites Layer > Mode: Sprite > Bullets > eldFire.grp in starforge, and Sprites > Sprites > Unknown > Unknown > Unknown03 in SCMDraft.
(I suggest using this in SCMDraft becaus eit has a huge ugly yellow ring in starforge.)
Well, it's far from complete, but it's a start. Hopefully we can oneday catalogue and answer all those questions about terrain out there.
Do you want to get into terrain but don't know where to start?
Are you a beginner at terrain with a beginner's question?
Look no further!
[center]=-=-=-=-=-=-=
The Resources.
=-=-=-=-=-=-=[/center]
[center] SCMDraft2
Starforge
X-tra Editor [/center]
[center]=-=-=-=-=-=-=
The Palette.
=-=-=-=-=-=-=[/center]
[center] ~SCM [√], Starforge [√], X-tra [X]~ [/center]
The palette is a wonderous device, every possible terrain tile within a tileset (Jungle, Ashworld etc.) indexed for blending and creation of custom pieces.
~SCMDraft Aproach~
1.Open SCMDraft with any map you have in mind.
2.Now either click Windows > Terrain Palette. Or isometrical > Tileset Indexed along the top GUI.
3.If the later; You're done! Just drag the sides of the window into a larger format for increased visibility.
b)If the former, click Isometrical > Tileset Indexed on the new popup window, drag into a larger window and tada! You're done.
~Starforge Aproach~
1.Reapeat step one from the previous, replacing SCMDraft with Starforge.
2.Click Unit Layer > Terrain Layer on the top GUI.
3.Click Palette.. on the new side GUI.
4. Tada, you're done. The new window is Starforge's sexy default large palette.
[center]
[/center][center]=-=-=-=-=-=-=
Brushes of Leonardo.
=-=-=-=-=-=-=[/center]
[center] ~SCM [X], Starforge [√], X-tra [X]~ [/center]
Brushes are a nice Starforge only feature wich can make terraining go by much faster with a little experience.
1.Open starforge and your map/terrain piece.
2.Click Unit Layer > Terrain Layer on the top GUI.
3.Click Custom... on the new side GUI
4.This is the brush palette, notice the emptiness.
-To add custom brushes-
1.Drag the mouse (while clicked) over your terrain piece.
2.Right click > Create Brush.
3. Tada, you're done. Right clicking areas on the brush make them transparent and to save the brush just click save!
[center]
[/center][center]=-=-=-=-=-=-=
Cut and Paste.
=-=-=-=-=-=-=[/center]
[center] ~SCM [√], Starforge [X], X-tra [X]~ [/center]
1.Open your piece in SCMDraft and click Isometrical > Cut/Copy/Paste on the top GUI.
2.Open the terrain palette while in this layer.
When in this mode simply right click and select copy / paste / cut, or use the coresponding keyboard shortcuts.
[center]=-=-=-=-=-=-=
Cliffs; Always Seen, Never Heard.
=-=-=-=-=-=-=[/center]
[center] ~SCM [√], Starforge [√], X-tra [X]~ [/center]
Cliffs are simply dirt to high dirt with a few more high dirts in between.
1.Open your favorite palette program.
2.Lay some isom high dirt and put water around it.
3.Exchange the water for matching cliff pieces in the palette.
4.If you're too lazy just add the tiles onto the high dirt.
(I wouldn't suggest starting there.)[center]
[/center][center]=-=-=-=-=-=-=
Blending for Dummies.
=-=-=-=-=-=-=[/center]
[center] ~SCM [√], Starforge [√], X-tra [X]~ [/center]
The most important aspect in terraining, how to make your pieces not blocky without resorting to sprites. (Which is incredibly useful for large maps.)
1.After making your initial most likely poor isom and rectagular piece open up the good ol' palette and start searching.
2.Look CAREFULLY it doesn't have to be a piece of a cliff to finish your cliff-temple blend. Hell, it doesn't even have to be a piece of temple, maybe it could be a piece of the bridge?
3.Be patient, you won't get godly skills overnight and it might take longer than 2
if at first your blend doesn't succeed try, try again.[center]
[/center][center]=-=-=-=-=-=-=
Doodads and Sprites.
=-=-=-=-=-=-=[/center]
[center] ~SCM [√], Starforge [√], X-tra [√]~ [/center]
A sprite is a static image within the game that units can walk under, a doodad is a sprite combined with a piece of tileset unique terrain that serves as an obstacle or as cover.
~SCMDraft Aproach~
1.Open SCMDraft and click Terrain > Sprites on the top GUI.
2.Look through the list of sprites until you find one you like, the place it.
For doodads.
1.Click Windows > Doodad Palette on the top GUI
2.Place the doodads on the right terrain, illegally placed doodads are just plain ugly.
~Starforge Aproach~
1.Open Starforge and click Units Layer > Sprites Layer on the top GUI.
2.Next, click Mode : Unit on the side GUI, it should now say Mode : Sprite and the tree menu should be much much larger.
3.Simply look thtough the tree for the sprites you want, even the units are counted as sprites.
For doodads.
1.Open the custom brush palette in starforge.
2.Click Load... and select the set of doodads you want from the Starforge Data file.
3.Again, don't use the for ugliness.
~X-tra Approach~
(Sprites not supported.)
1.In X-tra editor click Terrain Layer > Doodad Layer on the top GUI.
2.BOOM the doodad palette pops up automatically and you're good to go.
~EldFire.GRP~
Perhaps the most wondered of sprite in all of terrain, eldfire.grp is basically a unused bullet that now serves no other meaning than making waterfalls sparkly.
It is located in Sprites Layer > Mode: Sprite > Bullets > eldFire.grp in starforge, and Sprites > Sprites > Unknown > Unknown > Unknown03 in SCMDraft.
(I suggest using this in SCMDraft becaus eit has a huge ugly yellow ring in starforge.)
Well, it's far from complete, but it's a start. Hopefully we can oneday catalogue and answer all those questions about terrain out there.
Report, edit, etc...Posted by WoodenFire on 2005-10-29 at 14:13:13
Oh yea, for sprites, make sure you also put in the 1 that is a gyser smoke cloud.
! and the cliff picture you have is a bad example...
3rd coluom from left, bottom cliff face is 100% WrOnG, only works on top pieces.
:P
And my example of blending is a little unrealistic... maybe put in some more, but combine them all into 1 picture, so you don't go over the 10 max limit!
! and the cliff picture you have is a bad example...
3rd coluom from left, bottom cliff face is 100% WrOnG, only works on top pieces.
:P
And my example of blending is a little unrealistic... maybe put in some more, but combine them all into 1 picture, so you don't go over the 10 max limit!
Report, edit, etc...Posted by Syphon on 2005-10-29 at 14:28:46
QUOTE(WoodenFire @ Oct 29 2005, 12:13 PM)
Oh yea, for sprites, make sure you also put in the 1 that is a gyser smoke cloud.
! and the cliff picture you have is a bad example...
3rd coluom from left, bottom cliff face is 100% WrOnG, only works on top pieces.
And my example of blending is a little unrealistic... maybe put in some more, but combine them all into 1 picture, so you don't go over the 10 max limit!
[right][snapback]343694[/snapback][/right]
Meh it's still blending, and the picture is a link to your collection.
What do people often use geyser smoke for?
Report, edit, etc...Posted by Rantent on 2005-10-29 at 15:26:52
QUOTE
3rd coluom from left, bottom cliff face is 100% WrOnG, only works on top pieces.
ROFL!!!Anyway, I'm thinking that when glytcher finishes his guide I might combine this with his and pin it.
Report, edit, etc...Posted by Syphon on 2005-10-29 at 15:43:19
QUOTE(Rantent @ Oct 29 2005, 01:26 PM)
ROFL!!!
Anyway, I'm thinking that when glytcher finishes his guide I might combine this with his and pin it.
[right][snapback]343728[/snapback][/right]
Anyway, I'm thinking that when glytcher finishes his guide I might combine this with his and pin it.
[right][snapback]343728[/snapback][/right]
Well for now this one also has a link to the old cliff tut.
Report, edit, etc...Posted by RedNara on 2005-10-29 at 15:56:04
i like this guide it think it might be usefull for new ppl
well i think to get better at terrain you just have to do it a few times and get better at it..
there really isnt a program that helps you or a set of things...
well i think to get better at terrain you just have to do it a few times and get better at it..
there really isnt a program that helps you or a set of things...
Report, edit, etc...Posted by glytchur on 2005-10-29 at 16:58:55
this is a cool tut, and my old cliff tut will be next to nothing compared to my new one...
gj syphon...
gj syphon...
Report, edit, etc...Posted by Hitl1r1 on 2005-10-29 at 17:07:48
This is a really good tut and all but...
You spelled Beginner's wrong
You spelled Beginner's wrong
Report, edit, etc...Posted by NerdyTerdy on 2005-10-29 at 19:50:31
Wow, you're picky. Who cares? I liked it I actually didn't know right clicking the  customs in SF made it transparents This will help me
  .
.
customs in SF made it transparents This will help me .Report, edit, etc...Posted by 00cnr on 2005-10-29 at 23:38:15
Good tutorial, maybe people can post some brushes they made...?
Just a thought.
Just a thought.
Report, edit, etc...Posted by Syphon on 2005-10-29 at 23:51:43
QUOTE(Hitok1r1 @ Oct 29 2005, 03:07 PM)
This is a really good tut and all but...
You spelled Beginner's wrong
[right][snapback]343788[/snapback][/right]
You spelled Beginner's wrong
[right][snapback]343788[/snapback][/right]
The cerse of huried tuping strikes agine.
QUOTE(00cnr @ Oct 29 2005, 09:38 PM)
Good tutorial, maybe people can post some brushes they made...?
Just a thought.
[right][snapback]344031[/snapback][/right]
Just a thought.
[right][snapback]344031[/snapback][/right]
That's actually a very good idea... *Syphon Considers some things.
POST THOSE BRUSHES!
Report, edit, etc...Posted by Staredit.Net Essence on 2005-10-30 at 02:42:11
Interesting.
Report, edit, etc...Posted by TDT-DaRkFiRe on 2005-10-30 at 07:00:41
Maybe some people should make a map, wich explains all the blends in a tileset, and other tricks. And I dont mean with triggers or anything, but just like Tuxedo did on badlands. I found it very usefull. (Where is he, anyway?)
Report, edit, etc...Posted by Merrell on 2005-10-30 at 09:47:54
QUOTE(WoodenFire @ Oct 29 2005, 01:13 PM)
and the cliff picture you have is a bad example...
[right][snapback]343694[/snapback][/right]
[right][snapback]343694[/snapback][/right]
Just because it isn't yours, right? Eh, you think all other terrains are bad. Your terrain isn't all that great.
Report, edit, etc...Posted by Deathawk on 2005-10-30 at 10:02:44
Yeah, I've notice your arrogance when it comes to terrain too.
Report, edit, etc...Posted by Oo.Turin.oO on 2005-10-30 at 10:50:24
QUOTE(Merrell @ Oct 30 2005, 06:47 AM)
Just because it isn't yours, right? Eh, you think all other terrains are bad. Your terrain isn't all that great.
[right][snapback]344183[/snapback][/right]
[right][snapback]344183[/snapback][/right]
Finally people point it out. Most of his stuff is pretty good. He's not bad at all. But if its not his, it suddenly sucks. I've never seen him give a good review to anybody.
Report, edit, etc...Posted by TDT-DaRkFiRe on 2005-10-30 at 12:11:48
I dont think hes a really bad guy, he should just focus more on helping people, tell them what there doing right and what not. I dont just say it sucks, just say whats missing.
Report, edit, etc...Posted by WoodenFire on 2005-10-30 at 13:12:35
First of all, the cliff face is wrong... its not a big deal, I talked to Syphon before he posted this... it was what we call, funny.
Wow, so many people just pounce when I say 1 thing you would find offensive If I said it directly to you, and yet... I said it to Syphon.
Just a joke.
Stop flamming.
Wow, so many people just pounce when I say 1 thing you would find offensive If I said it directly to you, and yet... I said it to Syphon.
Just a joke.
Stop flamming.
Report, edit, etc...Posted by Deathawk on 2005-10-30 at 13:18:17
No woodenfire, I did not make this conclusion based on this occurrence, okay?
You just seem to look down upon everybodys terrain except your own, as if yours is better than everybody elses.
You just seem to look down upon everybodys terrain except your own, as if yours is better than everybody elses.
Report, edit, etc...Posted by Syphon on 2005-10-30 at 13:18:44
Ya seriously, I don't care, do any of you care? It's not a big deal, he pointed out minor blockiness in a joke tone. If he can give me a better shot of a basic cliff I'll put it but for now... Just no.
Report, edit, etc...Posted by T3mplaR on 2005-10-30 at 14:06:50
Why not make a tutorial and then sticky it?
Report, edit, etc...Posted by asskickinnoob on 2005-10-30 at 14:59:56
yay thx!!!! 
this helps LOTS
this helps LOTS
Report, edit, etc...Posted by Gigins on 2005-10-30 at 16:17:52
How about Draft's copy/paste option? I wouldn't suggest SF for Beginners, because stuff looks just ugly on SF.
Report, edit, etc...Posted by Syphon on 2005-10-30 at 16:28:06
QUOTE(DEAD @ Oct 30 2005, 03:17 PM)
How about Draft's copy/paste option? I wouldn't suggest SF for Beginners, because stuff looks just ugly on SF.
[right][snapback]344458[/snapback][/right]
[right][snapback]344458[/snapback][/right]
I never use SCMDraft cut/paste so I don't know how to use it. If you explain it I'll add it in.
Report, edit, etc...Posted by Gigins on 2005-10-30 at 16:33:15
So if you don't use it then beginners don't need to know about it? It is very very useful option.
How to use? Select copy/paste in terrain mode window or just right click on screen when in terrain layer and copy/paste like in paint
How to use? Select copy/paste in terrain mode window or just right click on screen when in terrain layer and copy/paste like in paint